Saturday, December 7, 2024

Steeda Lowering Springs and Rear Swaybar

I've been wanting to do this for a while, you know make an SUV handle better.  Not what you usually hear from soccer moms and grocery getters, but this is an Explorer ST - you drive it!  I got the Steeda Explorer Lowering Springs from a local seller who bought them and never installed - got a great deal on them!  I ordered the Steeda Explorer Adjustable Rear Sway Bar online as well.  I already installed the Steeda Explorer Strut Tower Brace so essentially I was building the Steeda Explorer Ultimate Handling Package.

Let's talk about each these components and why you would want to add this to your already well-handling Explorer ST.

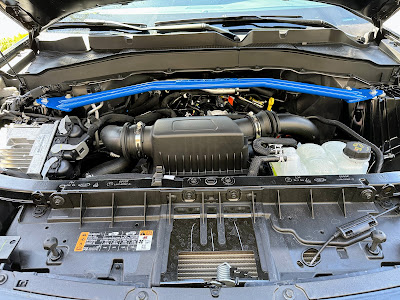
Increased rigidity. A stamped steel strut tower brace comes standard on the Explorer ST but it may not offer the greatest performance. The Steeda strut tower brace features strong steel tubing and sturdy mounting plates to ensure great strength.  It also gives you a custom look. Compared to the stamped steel piece the Steeda strut tower brace is an eye-catcher when you pop the hood. This brace is a great way to give your SUV a unique look at meets and shows. It comes with a wrinkle black powder coat finish but I opted to pay $25 for the Steeda Blue powder Coat, just call them!


Stability and control. Distributing the weight of your Explorer between the rear wheels when turning, the Steeda sway bar helps to keep your SUV level in corners and planted to the road.  The bar is 3-way adjustable and up to 4x the stiffness of the OE swaybar.  I opted for the middle setting, not too aggressive and it feels excellent.  You can see it peeking out in the install bay - not yet attached.


Improved handling and performance. These Steeda springs help to lower the center of gravity, providing better handling characteristics. Brake dive and cornering are also improved due to a higher spring rate that doesn't compromise comfort. The springs also offer a more aggressive look. With a 1-1/8 inch drop front and rear, the Steeda springs give you a lower stance and more performance-oriented style without compromising the functionality of the SUV. We didn't want to drop the SUV too low as to interfere with parking and curbs, so these are perfect!

Lastly, once installed - you need to get your car aligned to set the specs back to factory alignment.  Fortunately the shop I took them to did everything as well as perform the rear backup camera recall as well!  


Overall, it's only been a day since the install.  The 'feel' is different, more 'planted' in the seat and the Explorer feels much more like our old Focus ST where it could turn on a dime.  The springs will take a few miles to 'settle' after some road exercise and come down to their lowered height.  Overall very pleased with the setup.  Between the strut tower brace, rear sway and springs - we have an Explorer that can handle just as good as it can GO!


Wednesday, August 7, 2024

REDTIGER Dash Cam time!

 An unfortunate series of events led to my wife rear-ending a small vehicle.  The guy admitted that he was driving poorly and caused the accident, but insurance used their ancient policy to blame the car in the rear.  Enough of that!  I instantly ordered a dash cam so we can record any future incident.  I opted for the REDTIGER brand, the price is great and the performance is excellent!!


The installation was pretty straightforward, and I used the following parts:

Visit the REDTIGER Store
4.4 out of 5 stars 7,942 ratings | 820 answered questions

REDTIGER Dash Cam Front Rear, 4K/2.5K Full HD Dash Camera $119 (after $30 off coupon)
SAMSUNG EVO Select Micro SD-Memory-Card 256GB $17
REDTIGER 3M Mount F7N Dash Cam with GPS Module $20
REDTIGER F7N Dash Cam Hardwire Kit,11.5ft USB C Port Hard Wire Kit for Dashcam $20
REDTIGER F7N Circular Polarizing Lens, CPL for Dash cam $21

The specs are phenomenal!
  • 4K Dual Recording: With Ultra HD 4K (3840x2160P) front and FHD 1080P rear recording capabilities, this dash cam captures key details such as road signs and license plates. It's ideal for providing clear evidence in unexpected situations.
  • Superior Night Vision: Featuring an F1.5 large aperture and 6-layer optical lens, along with HDR/WDR technology, the dash cam ensures excellent performance under low light conditions, capturing clear details at night.
  • Wi-Fi & Smart App Control: Connect the dash cam to your smartphone via Wi-Fi and manage it through the "Redtiger" app. You can view, playback, and download recordings directly to your iOS or Android device, and share your travel moments easily.
  • Built-in GPS: The dash cam's built-in GPS records driving routes, real-time speed, and location, providing crucial additional evidence if an accident occurs. You can track your journey on Google Maps via the app or GPSPlayer on Windows and Mac.
  • Reliable Features for Accident Recording: Even when the memory card is full, the dash cam continues recording with its loop recording feature. The G-sensor detects sudden collisions and locks the footage, while the 24-hour parking monitor records continuously with a time-lapse function (hardwire kit needed).
  • 18-Month Assurance & Customer Service: The dash cam comes with an 18-month warranty and 24/7 customer service. We offer technical support to resolve any product, installation, or usage issues you may encounter.


Monday, October 16, 2023

AFE Momentum Intake Installation

 Lethal Performance has awesome marketing, they post stuff - I buy it!  Got a great deal on the AFE MOMENTUM GT COLD AIR INTAKE SYSTEM W/ PRO 5R MEDIA (2020-2022 EXPLORER ST) - 50-70076R  

The installation is pretty straightforward, took about 1.5 hours, overall very happy with it!


also checked the oil catch can, got a little bit after 5k miles - another great mod!


all installed and rockin!


Tuesday, May 16, 2023

Upgraded LED lighting for the rear

 One thing I'm huge on is visibility when you have tinted windows.  Upgraded LEDs can make a HUGE difference, not only in driver visibility but also to be seen better by other drivers.  The rear lights on the Explorer ST are good, but like most OEM parts can be upgraded.  I reached out to one of the Facebook groups and found this setup from Houston Speed Freaks  Upgraded turn signal bulbs, backup lights and license plate lights.  All are about 2-3X brighter - which is amazing!


pop off this square tab, and the taillight pulls out from the outside

you can use a socket to loosen the screw

simple swap of the old bulbs for the LEDs

the backup light is an extended part, just tuck the wires inside the housing

oem license plate bulb

new LED bulb, less power, less heat, and 2x as bright!


Upgraded to the Steeda strut tower brace and J&L Oil Catch Can

 Minor upgrade IMHO, but looks pretty cool!  I paid the extra $25 to have the Steeda Blue powdercoat, and the swap took about 30 minutes. https://www.steeda.com/steeda-555-5734-explorer-strut-tower-brace

While I was under the hood, I also did the J&L Oil Catch can to keep that oil bypass out of the intake, great cost and worth the trouble - especially with twin turbo vehicles.


OEM Strut tower brace, just a stamped piece of aluminum

simple removal - just a ratchet and 4 bolts

comparison of the OEM (top) and Steeda (bottom)

you can see the Steeda brace with extra hardware, nice flash of color!

The J&L Oil Catch can took about 15 minutes to install!


Sunday, March 19, 2023

Really slick LED light strip for the Explorer ST

 We found this mod on Facebook on the Explorer ST group, I can't take full credit for it - but figured for ~$40 it was worth trying out.  First you have to get the parts to setup.


Great! Now that you have the parts, the setup is pretty simple.  First, test the strip to ensure it's working, you can do a quick connect to the battery for this, red to positive and black to negative.   Not only can you see it working, but also tell which side is projecting the light.   

Pop the hood and clean the top of both headlights and the grill section top.  You don't want to use any harsh chemicals, just a good cleaning will do to ensure the tape will stick well.  This is also a good time to see where the hood seal lays when the hood is closed, you'll want to follow this line with the new LED strip.  I used painters tape to setup the strip and hold in place, it will want to wriggle around a bit since it comes curled up in the box.  

Once you're satisfied with the layout, peel off the bottom red tape strip and start adhering to the car.  You'll notice in my pictures that the 70" strip is perfect as it will tuck a few inches back on both sides of the hood under the fender.  I placed some black 3M electrical tape to hide the red at the edges of the hood.


Next up was to do the wiring.  I cut the black cable and stripped about 1/2" off and used one of the driver side fender bolts as a ground, worked great and one less cable to run.  The red wire I placed under the driver fender and ran back to the fuse panel which is hiding under two protective covers.  The top cover is pretty simple, push two tabs and it comes up and off.  The fuse box has 3 tabs, one toward the center of the vehicle and two (front and rear) closest to the driver fender.  

I measured and cut just behind the fuse that comes with the kit.  Since this is going into the fuse panel, you won't need the inline fuse.   Use a fuse puller, or a thin set of wiring pliers and remove Fuse #21 - this fuse goes to the headlights and will automatically turn on (and off) when the vehicle starts (or stops).  


This is where your fuse tap kit comes into play.  Use the 10A fuse that you just pulled and place it in the slot closes to the pins.  Then use a 5A fuse that came with my kit and plug it into the top slot.  This way you protect your headlights as usual, and add a 5A circuit for your LED strip (which will use much less than 5A).  Next, strip off the ends of the wire from the tap and from the LED red wire.  I used Solder Seal Wire Connectors-Marine Grade Heat Shrink Wire Connectors since they're easy to use with a heatgun, offer a good soldered connection and they're waterproof for extra protection.  


I actually flipped the fuse around to direct the wire closer to the fender side of the box but it's a pretty simple setup and works great!  Next up, check your hood clearance.  In my case, the hood wouldn't close with both the LED strip and the protective rubber under the hood so I pulled the rubber from the hood.  Some have adjusted their hood height adjusters but I didn't want the hood higher than the fenders.

So far it's been good, will check over time to see if the LED strip is good enough to block water, etc from the engine bay.

Last part, test!  Close the hood and start it up!


Friday, March 17, 2023

Time to black it out, add protection, and some patriotism!

 My wife wanted dark, so we did 5% all around - have a local shop that does an amazing job!  Reach out to Chris at Royal Tint, we've been going to him for 6+ years now and have had awesome results.  Not the best pic, but you can see the new 5% all around (just a strip on the windshield).  Also added the Weathertech Ford Explorer Side Window Deflectors - they let fresh air in but no water, these go all the way down in front behind the mirror as opposed to the Ford ones that leak water just above the mirrors.


I also wanted to protect other parts of the car, so I ordered the WeatherTech No-Drill Mudflaps for Ford Explorer Front & Rear Set, and the Rongtaod Fit 2020-2023 Ford Explorer Trunk Mat


The mudflaps (more like solid flaps) are relatively easy to install.  I used an 8mm socket and a screwdriver - the rears are VERY easy, and well mounted.  The fronts only require turning the wheels side to side to get more clearance.  


The rear trunk protection was a 'hope' that it matches the quality of more expensive parts, and I have to say it's a good setup!  The nice part of this cover is that you can split the back seats and have just one side down.  Not all protectors are like this so it's great flexibility!  Also, the Envelope Style Trunk Mesh Cargo Net has been nice to wrangle loose items in the back!  


Lastly, I love the distressed flag look.  I found these vinyl window rear quarter window covers from BOGAR TECH DESIGNS - Precut Distressed American Flag Rear Side Quarter Window Decals Compatible with Ford Explorer 2020-2022, Matte Black  Installed very easily, and great quality!